Individuals who want to schedule Zoom meetings using the Outlook calendar can now use the new Zoom for Outlook extension to integrate the two applications.
Prior to 2024, Zoom offered a plugin for Outlook that is no longer supported and may break event details.
This old Zoom plugin should be uninstalled, which is automatic for computers managed by Student Affairs IT. Follow the instructions below to manually remove it. The following images show the Old Zoom plugin which was available on the toolbar for the main calendar view. The new extension will not display on the full calendar view but will show up on the Event/Meeting toolbar once you open an existing meeting or create a new one.
FULL CALENDAR VIEW (Old):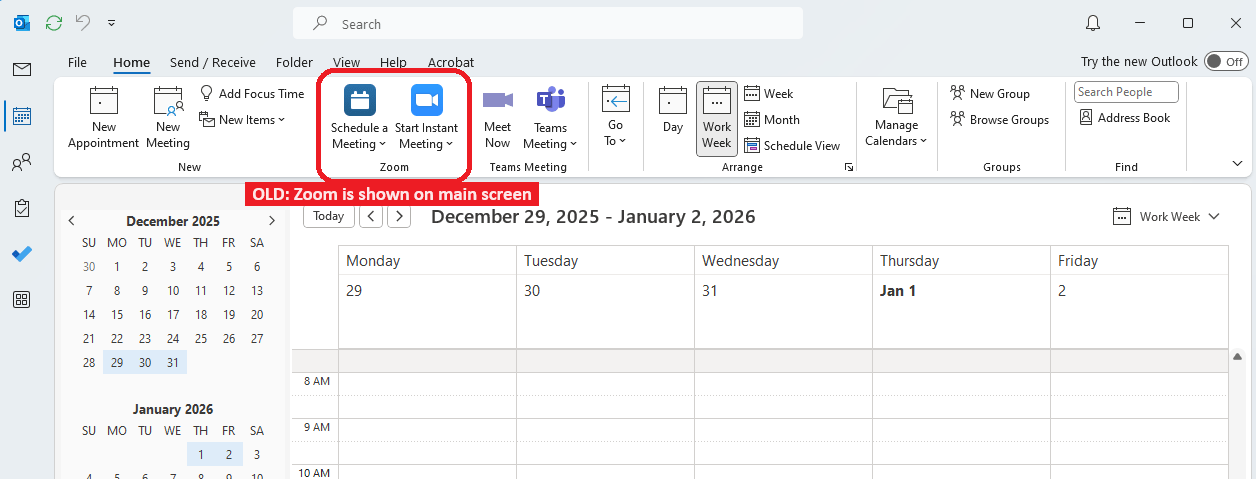
FULL CALENDAR VIEW (New):
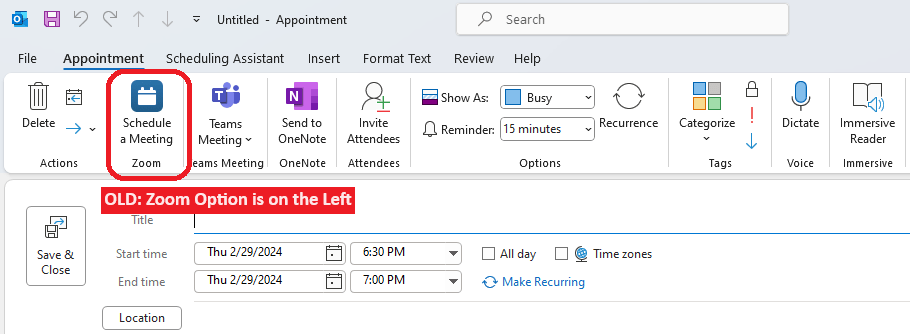
EVENT/MEETING Window (Old):
EVENT/MEETING Window (New):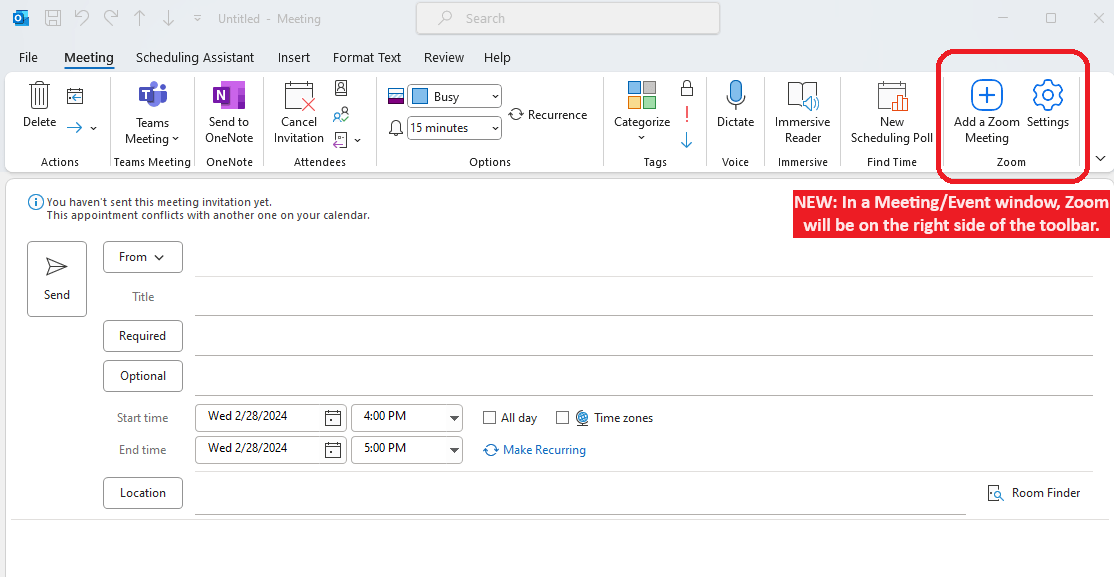
Be aware that Zoom session settings and details created with the old Zoom plugin cannot be edited with the new add-in. This means that if you need to make changes to an old Zoom meeting that was scheduled with the legacy Zoom plugin, it is recommended to simply delete the old meeting and reschedule it using the new Microsoft provided extension.
If you need assistance beyond the information provided, contact the IT Service Desk or call (919) 962-HELP.
Remove the Old Zoom Plugin for Outlook
Non-UNC managed computers may need to remove the old Zoom Plugin manually. If present, the old Zoom plugin appears in the Outlook calendar menu on the left side as seen in this image:
Uninstall the Zoom Plugin Manually from a Windows PC
- Close Outlook.
- Click the Start menu.
- Start typing
Add or Remove Programsand click that option when it appears in the results. - In the list of Apps & features, find Zoom Plugin for Outlook and select it. (The name may be followed by a version number.)
- Click Uninstall. (This may require administrative privileges. If so, contact Student Affairs IT and we can assist.)
Uninstall the Zoom Plugin Manually from a Mac
- Close all Office applications.
- Open Finder.
- Click Applications.
- CTRL-click Zoom Plugin for Outlook and then click Move to Trash or manually drag it to the Trash.
Verify the Zoom for Outlook Extension is Enabled
UNC Microsoft 365 email users should already have the Zoom for Outlook extension available in Outlook on the web (office.unc.edu). It should also be installed in the Outlook desktop application if SAIT manages your computer. When you open Outlook Calendar, it will no longer be shown on the general Outlook Calendar toolbar. However, when you open a calendar event or create a new event, you should see the add-in in the Zoom section of the event menu.
NOTE: the location has moved from the left side to the right side of the Meeting/Event toolbar:
Manually Install the Zoom for Outlook Extension
For personal computers, getting the Zoom for Outlook extension may be necessary or for SAIT managed computers where the add-in was mistakenly removed. For SAIT managed computers, you may also want to reboot your computer first.
In the Outlook desktop app on Windows
- Click File.
- Click Manage Add-Ins.
- Outlook will open Add-ins for Outlook in a browser.
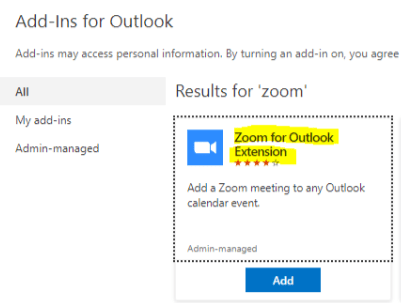
- Search for
Zoom for Outlookand click the Add button (see image above).
In Outlook on the web (office.unc.edu or heelmail.unc.edu)
- Click the Calendar icon.
- Click New Event, or open an existing event to which you would like to add a Zoom component.
- Click More (three dots).
- Click Get Add-Ins. Outlook will open Add-ins for Outlook.
- Search for
Zoom for Outlookand click the Add button (see image above).
In Outlook for the Mac
- Open Outlook.
- Click Home.
- Click Get Add-ins. Outlook will open Add-ins for Outlook.
- Search for
Zoom for Outlookand click the Add button in its listing (see image above).
Schedule an Outlook Calendar Event that Includes a Zoom Meeting
To create a new Outlook event (meeting or appointment) with a Zoom meeting link:
- Go to Outlook calendar and click New Meeting or New Appointment.
- In the Outlook desktop calendar, the Zoom section appears on the right end of the New Meeting/Appointment menu ribbon.
- In Outlook for the web, find the Zoom icon at the right end of the calendar event menu. Clicking the icon will open a menu with the options Add a Zoom Meeting and Settings.

- In the Outlook desktop calendar, the Zoom section appears on the right end of the New Meeting/Appointment menu ribbon.
- If prompted to sign in, click Sign in with SSO, which will take you to UNC’s SSO Onyen login page.

- Next, in the Company Domain field, type
UNCand click Continue.
- Log in as usual with your UNC Onyen and Password. Authenticate with DUO if required. You will then be returned to your Outlook meeting or appointment and the Zoom meeting link and information should be loaded into the meeting.
- Configure other Outlook event details as usual, such as the attendees and, if needed, physical Locations for hybrid in-person attendees. (Link details are blurred in this example.)

- When finished, click Save & Close or Send.
Update Zoom Meeting Settings in an Existing Outlook Calendar Event
To update the details of a Zoom meeting previously scheduled in Outlook calendar:
- Find the associated Outlook calendar event and open it.
- In the Zoom section of the menu ribbon, click Settings (gear icon). (In Outlook on the web, click the Zoom icon, then click Settings from the menu.)

- At the Sign In panel, click Sign in with SSO, if required.
- Next, in the Company Domain field, type
UNCand click Continue. - Log in as usual with your UNC Onyen and Password. Authenticate with DUO if required. You will then be returned to your Outlook meeting or appointment.
- The settings for the selected Zoom meeting will open in a side panel. Make the needed changes to your Zoom meeting, then click Update at the top of the Zoom panel to save.

- Click Save & Close or Send Updates.
If you need assistance beyond the information provided, contact the IT Service Desk.